Ever scrubbed your home’s siding or driveway, only to find the grime creeping back a few months later? I’ve been there. One weekend, I decided to tackle my neglected porch with a rented power washer. I thought I was doing it right—until I saw the streaks and stubborn stains that refused to budge. That moment was a real eye-opener. I realized I’d been missing some crucial techniques for effective, long-lasting results. If you’ve ever felt frustrated after a DIY power washing session, you’re not alone. The good news? There are proven methods that can transform your home’s exterior, making it look fresh and pristine for years to come.
Why Proper Power Washing Matters More Than You Think
Power washing isn’t just about aesthetics; it’s about protecting your investment. Dirt, mold, algae, and bacteria can deteriorate your home’s exterior over time, leading to costly repairs. Regular cleaning with the right techniques can prevent this damage and boost curb appeal, which is especially important if you’re considering selling or just want to enjoy a welcoming home. Plus, a clean exterior makes your entire property look more vibrant and well-maintained. But here’s the catch: not all power washing is created equal. Using the wrong pressure, nozzle, or cleaning solution can do more harm than good. That’s why understanding and applying proven techniques is key.
Is Power Washing Actually Worth the Hype?
Absolutely, but only if you do it right. I once tried to save money by skipping the proper prep and rushed through the job. The result? Uneven cleaning, surface damage, and a lot of frustration. I learned the hard way that rushing or using the wrong settings can ruin your exterior rather than restore it. For trustworthy, durable results, it’s best to follow expert advice and avoid these common pitfalls. If you want to learn how to power wash confidently and effectively, I recommend checking out this comprehensive guide. It covers everything from choosing the right equipment to expert techniques that ensure lasting shine.
So, if you’ve faced these struggles and are tired of lackluster results, stay with me. I’ll walk you through the proven steps to power wash your home safely and effectively, giving your exterior a fresh, durable look that lasts.
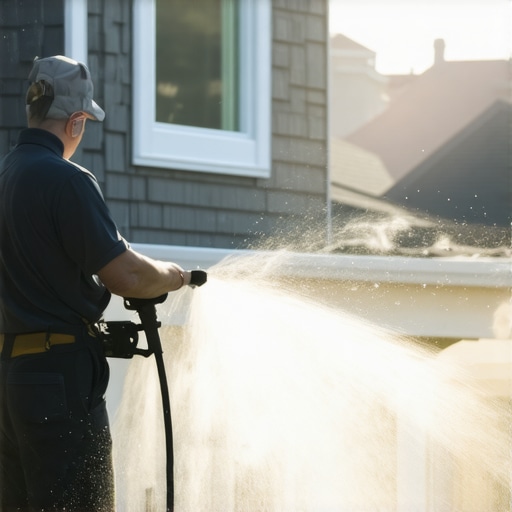
Prep Your Equipment for Success
Before diving into the cleaning process, ensure your power washer is in top shape. I once started a project with a rented unit that hadn’t been maintained properly, resulting in inconsistent pressure and poor results. Check the nozzle for clogs and make sure the pressure settings are suitable for your surface. Use a wide spray nozzle, like a 25-degree tip, for general siding cleaning to avoid damage. If you’re unsure, consult this trusted guide for detailed equipment setup tips.
Choose the Right Cleaning Solution
Power washing isn’t just about high pressure; the cleaning solution plays a vital role. I once tried just water on my porch, but stubborn algae persisted. I learned to mix a biodegradable detergent with water—typically one part detergent to five parts water—and apply it using a foam cannon or low-pressure spray. Let it sit for 5-10 minutes to break down grime and mold. Rinsing with high pressure afterward ensures a thorough clean. For more expert advice on cleaning solutions, see this article.
Master the Spray Technique
The way you direct your spray makes all the difference. I remember streaks on my siding because I was holding the nozzle too close and at the wrong angle. To avoid surface damage, keep the nozzle about 12 inches away from the surface and angle the spray downward to prevent pushing water behind siding or shingles. Use smooth, overlapping strokes, moving from bottom to top. Think of it like painting—consistent, controlled motions give the best look. Practice on a small area first to get a feel for the pressure and spray pattern.
Control Pressure and Nozzle Settings
Too much pressure can etch or gouge your exterior surfaces. I once set my pressure too high, causing a visible scratch on my wood siding. Always start with a lower pressure setting and increase gradually if needed. Switch to a 40-degree nozzle for delicate surfaces like wood or painted siding, and reserve the 25-degree for tougher grime. Remember, less is often more—err on the side of caution to protect your home’s integrity. For detailed pressure guidelines, check this trusted resource.
Work Systematically from Top to Bottom
I learned this lesson the hard way when I missed cleaning the upper sections of my house, leaving streaks below. Always start at the top and work your way down. This approach prevents dirty water from running over cleaned areas, keeping your work pristine. Use a ladder or extension wand to reach high spots safely, and keep your movements steady and controlled. This method ensures uniform cleaning and prevents re-soiling already cleaned sections.
Final Rinse and Inspection
After applying your cleaning solution and scrubbing, rinse thoroughly with a high-pressure stream. I once rushed this step and left soap residue, which attracted more dirt. Use a fan tip or wide-angle nozzle for rinsing to cover large areas quickly. Once done, walk around to inspect your work for missed spots or streaks. A thorough rinse combined with systematic coverage guarantees a lasting clean. For comprehensive tips on final inspection, refer to this detailed guide.

Many homeowners believe that power washing is simply a matter of blasting away dirt with high pressure. However, this misconception can lead to costly mistakes that damage surfaces or reduce the longevity of your cleaning. Let’s dig deeper into the nuanced pitfalls that even experienced DIYers often overlook and how you can steer clear of these traps.
Why the pressure setting isn’t a one-size-fits-all solution
One of the most common myths is that higher pressure always equals better cleaning. In reality, exceeding the recommended PSI for your specific surface can cause etching on wood, gouging on vinyl, or stripping paint. For delicate surfaces like painted wood or siding, using a lower pressure—around 1500-2000 PSI—is crucial. Rushing to crank up the pressure might seem tempting, but it’s often the fastest way to damage your home’s exterior. Always consult trusted sources like this guide for proper PSI guidelines tailored to different materials.
The trap of neglecting surface preparation
Skipping the prep work can seem like a time-saver, but it’s a surefire way to reduce your results and increase damage risk. Dirt, loose paint, and debris can be propelled into the surface, causing scratches or peeling. Always pre-wet surfaces, remove any loose debris, and apply a suitable cleaning solution before power washing. This not only enhances cleaning efficiency but also minimizes surface wear—an often overlooked detail that makes a significant difference in the durability of your results.
Advanced question: How do I know when to use chemical cleaners versus just water?
This is a nuanced decision that depends on the severity and type of grime. For example, mold, algae, or stubborn stains typically require a biodegradable detergent applied with low pressure or a foam cannon. Experts recommend using chemical cleaners for porous surfaces or heavily soiled areas. Rinsing thoroughly afterward with high pressure ensures no residue remains. To master this balance, review trusted techniques that detail when and how to incorporate cleaning solutions effectively.
Remember, rushing through power washing without understanding these nuances can backfire. It’s about precision, patience, and respecting the material properties of your home’s exterior. Have you ever fallen into this trap? Let me know in the comments.
Keeping your power washing equipment in top shape is crucial for ensuring consistently excellent results and extending the lifespan of your tools. Over time, even the best power washers can experience wear and tear, which can compromise their performance. Regular maintenance not only saves you money on repairs but also guarantees that your home’s exterior remains sparkling clean year after year.
One of my favorite tools for maintaining my power washer’s efficiency is a high-quality, adjustable pressure gauge. I personally use the Reliable Power Washer Gauge. It allows me to precisely monitor the PSI during each use, ensuring I don’t exceed the recommended pressure for delicate surfaces like vinyl siding or painted wood. This small investment prevents costly surface damage and maintains the integrity of my home’s exterior.
Another essential item is a durable, corrosion-resistant hose. I prefer hoses with reinforced braiding, which resist kinks and leaks over time. When it’s time to store your hose, drain all water to prevent freezing and cracking in colder months. Proper storage is a simple yet effective way to extend your equipment’s life.
Cleaning your nozzles regularly is vital. I use a small wire brush to remove mineral deposits and debris. This guarantees a consistent spray pattern and prevents uneven cleaning. For even better results, I recommend having a set of different nozzles for various tasks—ranging from wide-angle nozzles for siding to pinpoint nozzles for stubborn stains. Switching between these allows for precise control over your cleaning process, saving time and preventing damage.
It’s also wise to keep your cleaning solutions fresh. I store detergents in sealed, clearly labeled containers and replace them annually. Old or contaminated cleaning solutions can clog your pump or reduce cleaning effectiveness, leading to more passes and potential surface damage. Always follow the manufacturer’s recommendations for chemical use to avoid voiding warranties or causing harm to your surfaces.
Looking ahead, I believe that smart, connected power washing tools will become more prevalent. Devices that monitor pressure, flow rate, and chemical use via smartphone apps will help homeowners achieve professional-grade results with ease. Investing in these smart tools now can streamline your routine and enhance long-term results.
How do I maintain my power washing tools over time?
The key to maintaining your power washing tools is regular inspection and cleaning. After each use, flush your system with clean water to remove dirt and detergent residues. Check hoses and fittings for leaks or cracks, and replace any worn parts promptly. Additionally, lubricate moving parts as recommended by the manufacturer, and store your equipment in a dry, sheltered space. Following these simple steps ensures your equipment remains reliable and ready for your next project.
Finally, I encourage you to try out the advanced tip of monitoring your PSI with a reliable gauge during each session. This small step can significantly improve your results and protect your surfaces. For detailed guidance on maintaining your power washer, visit this trusted resource.
Throughout my DIY adventures, I’ve learned that the real secret to effective power washing lies in the details that often go unnoticed. One of the most eye-opening lessons was discovering that even seasoned homeowners underestimate the importance of surface-specific pressure settings. Using too much force on delicate siding or too little on stubborn stains can compromise your results and your surfaces. The key is to adjust your approach based on the material—trust me, a little extra effort in prep and technique pays off in a durable, pristine finish that lasts years. Additionally, I found that investing in a good quality pressure gauge prevents accidental damage, making the entire process more predictable and safe. For in-depth guidance on selecting the right equipment and settings, check out this trusted guide—it’s a game-changer for mastering trustworthy results.
Reading through this post really resonated with me because I’ve experienced the same frustrations with streaky results and ineffective cleaning. I used to rush through power washing, thinking more pressure equals better cleaning, but I quickly learned that it can cause damage, especially on delicate surfaces like vinyl siding. The tips about adjusting the nozzle angle, controlling pressure, and using the right cleaning solution are game-changers. I especially appreciate the emphasis on systematic top-to-bottom work—it keeps the process efficient and prevents re-soiling. Also, investing in a good pressure gauge made a noticeable difference for me, allowing precise control that protects my home.
One thing I’ve found helpful over time is regularly inspecting and maintaining my equipment—cleaning nozzles and checking hoses for leaks. It keeps everything running smoothly and ensures consistent results. Has anyone else noticed a significant improvement after upgrading their pressure control tools? I’d love to hear what gear or techniques other DIYers swear by to keep their exteriors looking fresh without risk of damage.