It was a bright Saturday morning when I finally looked at my house and realized just how tired and stained it looked. Despite my best efforts with brushes and garden hoses, nothing seemed to make a real difference. That moment of frustration turned into a lightbulb moment—I needed a better way, a proven technique to restore my home’s shine and boost its curb appeal. And that’s when I discovered the power of proper power washing, which not only saves time but also genuinely transforms a home’s exterior.
Why Power Washing Makes a Real Difference in Home Maintenance
For many homeowners, the sight of dirt, mold, or algae creeping over their siding or brickwork isn’t just unsightly—it’s a signal that their home needs some serious attention. Power washing, when done correctly, can profoundly improve both appearance and longevity of your exterior surfaces. But here’s the key: a lot of DIY attempts can end up causing more harm than good, especially if you’re not familiar with the right techniques. I learned this the hard way early on—my first attempt left streaks and damage that took months to repair. That mistake taught me the importance of using proven, safe methods.
If you’re like me, you might wonder: *Is it really worth investing in power washing?* I can tell you from experience that with the right approach, it’s not just about cleaning; it’s about building lasting trust in your home’s exterior. Proper power washing can boost your home’s curb appeal, prevent costly repairs, and even increase its value. And trust me, there’s nothing quite satisfying as seeing your home gleam like new after a professional treatment or a well-informed DIY session.
To truly understand the impact, I recommend checking out detailed guides that walk you through safe and effective techniques—like the ones you’ll find at [Power Wash Home with Confidence](https://powerwashexpertz.com/power-wash-home-with-confidence-proven-tips-for-lasting-trust-and-shine). Knowledge is the first step to making smart, lasting improvements.
Now, let’s dig into how you can achieve that professional shine safely and efficiently—because the last thing you want is to strip away paint or damage your siding. But first, do you ever feel overwhelmed by all the conflicting advice out there? Or worry about staining your beautiful home? You’re not alone, and I’ll help you navigate these concerns step by step.
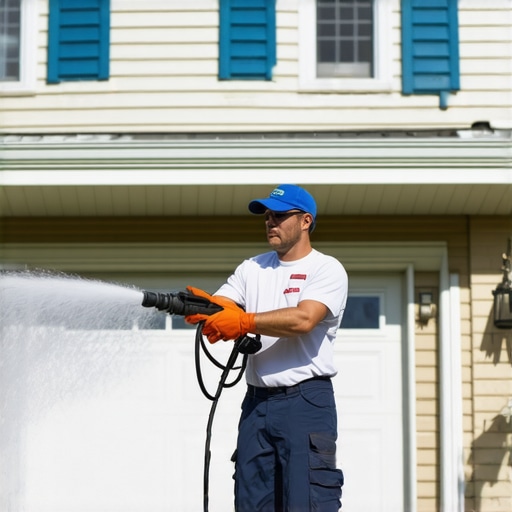
Prep Your Equipment and Environment
Before tackling your home, ensure your power washer is in top condition. Check for any leaks, ensure the nozzle is clean, and attach the appropriate spray tip. Clear the area of any obstacles, outdoor furniture, or delicate plants that could be damaged. Wear protective gear like goggles and gloves to safeguard against debris and high-pressure water.
Choose the Right Pressure and Nozzle for Your Surface
Matching the pressure and nozzle to your surface is crucial. For soft siding, use a lower PSI—around 1,200 to 1,500—similar to how you gently wash delicate fabric without tearing it. For concrete or brick, higher PSI—up to 3,000—is necessary, but always start with the lowest setting and increase gradually. A wider spray pattern reduces the risk of damage.
Test on a Small Area First
Always test your settings on a hidden corner to observe how the surface responds. I learned this the hard way when I sprayed a section of my vinyl siding with too much pressure, causing streaks. Testing avoids costly mistakes and helps adjust your technique safely.
Maintain Proper Distance and Technique
Hold the wand at about shoe-length (around 2 feet) from the surface. Use sweeping motions, similar to sweeping a floor, to avoid focusing high pressure on one spot which can cause damage. Keep the nozzle moving steadily—pause too long, and you risk etching or stripping paint.
Start from the Top and Work Down
This approach ensures dirt and grime are rinsed downward, preventing recontamination. Begin at the roofline or highest point, then work your way down in sections. This method mimics the natural flow of water and gravity, promoting an even, thorough clean.
Apply Cleaning Solutions When Needed
For stubborn stains, algae, or mold, pre-treat with a cleaning solution. Use a low-pressure nozzle to apply detergent, allowing it to sit for 5-10 minutes. Imagine it like applying soap to your car: it needs time to break down dirt before rinsing.
Rinse Thoroughly and Safely
Switch to a high-pressure nozzle to rinse away loosened debris and soap. Ensure you cover all surface areas evenly. Excessive pressure can damage paint or siding, so keep your distance consistent. For windows or delicate areas, switch to a gentle, low-pressure spray to avoid breakage or paint stripping.
Final Checks and Cleanup
Once the cleaning is complete, inspect your work. Touch up any missed spots with a gentle rinse. Turn off and drain your power washer, and store your equipment properly to prolong its lifespan. Clean up the area, reposition furniture, and enjoy your home’s newfound shine. For detailed technical tips on safe power washing techniques, visit Power Wash Home Safely Trusted Techniques.
 When it comes to power washing, many homeowners fall prey to myths or overlook nuanced risks that can compromise their results. A common misconception is that increasing pressure always leads to cleaner surfaces; in reality, exceeding the recommended PSI can strip paint, etch concrete, and damage delicate sidings. For soft surfaces like vinyl or wood, experts advocate using lower pressure settings and specialized nozzles, as detailed in trusted guides on safe power washing techniques—these nuances make a significant difference in achieving lasting results without unintended harm. One covert trap is using stiff-bristled brushes or abrasive cleaning agents, which can scratch surfaces or leave residues that trap dirt, defeating the purpose of a thorough clean. Instead, professional advice emphasizes gentle techniques combined with proper chemical pre-treatment for stubborn stains, as outlined in comprehensive tutorials on trustworthy power washing methods. A question that often puzzles even seasoned homeowners is: How do I balance effective cleaning with surface preservation? The answer lies in understanding the material-specific protocols—consulting expert resources can clarify these advanced nuances. Interestingly, recent studies show that improper pressure and technique are leading causes of surface degradation within the first year after cleaning, highlighting the importance of mastering these subtleties. For example, applying too much pressure on brick veneers can cause crumbling, a mistake I once made early in my DIY journey. To prevent this, always test your equipment on a small inconspicuous area, start with the lowest PSI, and gradually increase if needed, akin to the methods recommended at [Power Wash Home with Confidence](https://powerwashexpertz.com/power-wash-home-with-confidence-trusted-tips-for-lasting-trust-and-shine). Remember, the secret isn’t just in cleaning—it’s about doing so with a precise, informed approach that preserves and enhances your home’s exterior over time. Have you ever fallen into this trap? Let me know in the comments.Maintaining your power washing equipment and mastering the right tools are crucial for achieving durable, professional-quality results on your home’s exterior. Investing in the right gear not only saves you time but also prevents costly damage and ensures you maximize every cleaning session. One indispensable tool that I personally rely on is a variable-pressure power washer with an adjustable nozzle—this feature allows me to precisely tailor the water pressure to different surfaces, reducing the risk of etching or stripping paint, as recommended in trusted guides on safe power washing techniques. Additionally, I always keep a set of high-quality, stainless steel extension wands; these give me the reach to access high areas without the danger of climbing ladders, making my work safer and more efficient.
How do I maintain my power washing tools over time?
To ensure your equipment remains reliable and performs optimally, regular maintenance is essential. After each use, I thoroughly flush the system with clean water to remove residues, especially if I used detergents or cleaning agents. Inspect hoses and fittings for leaks or wear, and replace any damaged parts promptly. It’s also vital to store your gear in a dry, sheltered environment, especially during winter months, to prevent corrosion. Using a specialized pump protector or lubricant, as outlined in industry manuals, helps extend the lifespan of your pump and motor, maintaining peak performance for years to come. For comprehensive advice on keeping your equipment in top shape, I recommend visiting Power Wash Home with Confidence.”} {As I reflect on my journey through mastering power washing, I realize that the most valuable lessons came from unexpected challenges and personal discoveries. First, I learned that rushing the process often leads to damage—patience combined with the right techniques truly makes all the difference. Second, I realized that surface-specific knowledge is crucial; what works wonders on brick might harm vinyl siding if not adjusted properly. Lastly, I discovered that investing in quality equipment and understanding its maintenance is essential for consistent, long-lasting results. Embracing these insights transformed my approach from guesswork to confident craftsmanship, turning my home’s exterior into a shining example of effective care.