I remember the first time I fired up a power washer, eager to revive my worn-down driveway. I blasted away, expecting a sparkling transformation. Instead, I ended up with streaks, patches, and a stubborn layer of grime that refused to budge. It was a lightbulb moment—turning on the pressure isn’t enough. Without the right technique, you’re just moving dirt around, not cleaning it effectively. That disappointment made me realize thatTrustworthy Home Results are about much more than just spraying water; they require proven strategies and the right tools.
Getting to the Root of Power Washing Success
Today, I want to share with you the secrets I’ve learned along the way, so your next power washing job delivers the reliable, long-lasting shine your home deserves. Whether you’re new to power washing or have struggled with uneven results, understanding the core principles can make all the difference. Because let’s face it—coming away from a power wash with a clean home exterior that truly shines is incredibly satisfying, and it enhances your curb appeal significantly.
Is Power Washing Overhyped? This Is What I Fell for Early On
One mistake I made early on was thinking that more pressure meant better results. I thought cranking up the pressure would remove dirt and grime faster. Spoiler alert: it just damaged surfaces and made me redo the job. I learned that using the right technique is everything. For trusted, lasting results, it’s about careful application, correct nozzle selection, and understanding the delicate balance between pressure and flow. If you’re worried about causing damage or worse, wasting time and resources, you’re not alone. Luckily, there are proven methods and expert tips to help you avoid these pitfalls, like those found in this comprehensive guide.
So, are you tired of dealing with uneven, lackluster results every time you power wash? Keep reading, because I’m about to walk you through the essential steps to ensure your home gets the trust-worthy, professional-looking shine that lasts. No more guesswork—just reliable techniques you can trust to elevate your home’s exterior and boost its curb appeal.
Prepare Your Equipment to Get the Best Results
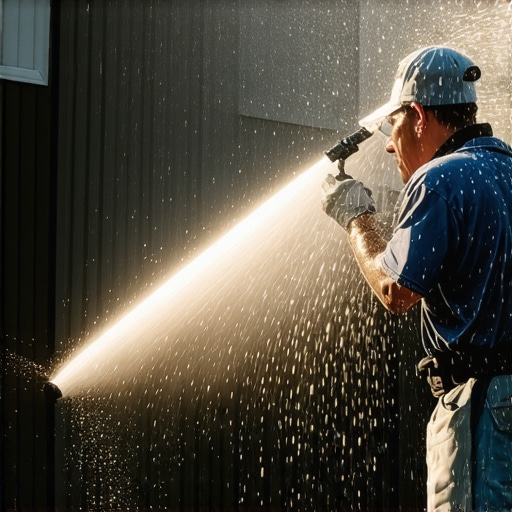
Before diving into actual cleaning, ensure your power washer is in prime condition. Check for any leaks, nozzle blockages, or worn-out hoses. Use a angled nozzle to start with a broader spray, which helps prevent surface damage and provides an even clean. I once neglected this step and started with a high-pressure nozzle; I ended up etching my siding instead of cleaning it. This taught me that proper prep is like tuning a musical instrument—it ensures the result hits the right note.
Choose the Correct Nozzle to Balance Power and Safety
The nozzle determines spray concentration. For most home exteriors, a 25-degree nozzle strikes a balance between cleaning power and surface safety. If you’re working on delicate surfaces like painted wood, opt for a wider angle, such as 40 degrees, to reduce risk. I learned this during my first siding cleaning when I used a 15-degree nozzle, which blasted away paint. Select the right nozzle by considering surface sensitivity and cleaning scope; this makes a significant difference in quality and durability of the results.
Apply Technique Consistently for a Professional Finish
Hold the wand at a consistent distance of about 12-18 inches from the surface and keep a steady motion, like mowing a lawn. Start at the top of the area you’re cleaning and work downward to prevent streaks. During my initial attempt, I moved haphazardly, which left uneven patches. Recognizing the importance of smooth, overlapping passes made my results uniform and trustworthy, just like trusted experts recommend in this trusted guide.
Mind the Angle and Movement
Use sweeping motions, about 2-3 feet wide, and maintain an angle of about 45 degrees for effective dirt removal without surface damage. I once zigzagged faster than I should have, missing spots and leaving streaks. Slow and deliberate motions may take longer but result in cleaner, more lasting outcomes. Think of it like painting—better to apply even strokes than rush and end up with an inconsistent finish.
Manage Water Flow and Pressure for Safety and Longevity
Adjust the pressure settings according to your surface. For delicate sidings or windows, lower the pressure to prevent damage; for tougher surfaces like concrete, higher pressure speeds up cleaning. During an early project, I used maximum pressure on brick, causing chipping, which I later absorbed with better techniques from this effective strategy. Modulating water flow ensures you clean effectively without harming your property or wasting resources.
Keep Moving to Avoid Damage and Overwatering
Stay in constant motion, avoiding pauses that can cause striping or streaks and risking water pooling. Imagine moving a broom steadily across a floor—the same principle applies. During my initial trials, I hesitated, which resulted in uneven patches. A continuous, smooth movement keeps the surface uniformly clean and prevents surface fatigue, ensuring your results last longer, as emphasized in trusted expert advice.
Rinse Carefully to Reveal the True Clean
After applying detergent or work on stubborn stains, rinse thoroughly from the top downward to eliminate residue. Make sure to keep the wand moving so as not to drive water into unwanted areas, which can cause damage over time. During a recent project, I missed this step and had to redo parts due to soap residue. Proper rinsing is like clearing a fog—it reveals the true, clean surface and preserves your work’s integrity. For detailed guidance, explore these proven tips.
Many homeowners assume that cranking up the pressure on their power washers guarantees a spotless exterior, but in reality, this common belief can lead to more harm than good. The truth is, most people overlook the importance of understanding the nuanced interplay between pressure, nozzle choice, and surface sensitivity. For instance, using maximum pressure on delicate sidings can etch or strip paint—an advanced mistake that even seasoned DIYers often make. Instead, mastering the subtle art of adjusting water flow and nozzle angles according to the specific surface significantly enhances results and longevity. Contrary to popular myths, slower, controlled movements combined with proper technique yield more trustworthy and lasting outcomes. This nuanced approach not only prevents damage but also optimizes cleaning efficiency. Want to dive deeper? Check out trusted techniques for lasting results to elevate your power washing game. Remember, rushing or oversimplifying can cause costly mistakes—so take the time to learn and apply these expert insights. Have you ever fallen into this trap? Let me know in the comments.
Once you’ve mastered the fundamentals of power washing, maintaining your equipment becomes essential to ensure consistent, professional-quality results over time. Investing in high-quality tools and adopting effective maintenance routines not only prolongs the lifespan of your equipment but also guarantees that each job meets the trusted standards you’ve set for yourself. Today, I’ll share specific tools I rely on and actionable maintenance tips to keep your power washer performing at its best, ensuring your home continues to shine reliably year after year.
Tools I Recommend for Long-Term Reliability
First and foremost, a durable, adjustable wand is a game-changer. I personally use the MTM Hydro 4003 because of its robust construction and versatile spray options. Its ergonomic design reduces fatigue during extended sessions, and the adjustable nozzle allows me to switch seamlessly between wide-angle and high-precision beams. This flexibility is crucial when transitioning between delicate sidings and tough concrete cleaning. Additionally, a tri-axial surface cleaner attachment streamlines large-area jobs, providing even pressure and preventing streaks, which is vital for trustworthy results. I always keep a set of premium nozzles on hand, as they wear out over time and affect spray consistency.
Essential Maintenance Practices for Peak Performance
Regularly inspecting and cleaning your pressure washer is fundamental. I recommend wiping down filters, checking hoses for cracks or leaks, and replacing worn-out O-rings every season. Using a fuel stabilizer if you have a gas-powered unit ensures the engine runs smoothly and prevents corrosion. For electric models, keeping the motor vents clear is equally important. I also advocate for flushing the system with clean water after each use to prevent mineral buildup, especially in areas with hard water. Following these practices safeguards your investment and guarantees that each power wash delivers the trusted, lasting results you seek.
Predicting Future Trends in Power Washing Equipment
Looking ahead, I expect advancements in eco-friendly, low-pressure systems paired with high-efficiency nozzles to revolutionize the industry. These innovations will make power washing safer for delicate surfaces and more energy-efficient, aligning with environmental concerns. Additionally, smart-integrated systems that monitor pressure and flow in real-time could offer automatic adjustments, minimizing user error and maximizing cleaning effectiveness. Embracing these tech trends now will position you as a master of modern power washing, ready for whatever the future holds.
How do I maintain my power washing tools over time?
Consistent upkeep is key. Regularly cleaning filters, inspecting hoses, replacing worn nozzles, and storing equipment in a dry, covered area extends its lifespan. For detailed guidance, explore trusted maintenance techniques. Make a habit of performing these checks after each job, and you’ll find your equipment performs reliably and helps you achieve the dependable, impressive results your home deserves. One advanced tip I suggest trying is using specialized nozzle lubricants to prevent clogging and corrosion, which can significantly improve longevity. Give this a try on your next routine—your tools will thank you.
What I Wish I Knew Before Starting Out
One of the most transformative lessons I learned was that patience beats pressure. In my early days, I believed cranking up the water speed would deliver instant results, but I quickly realized it often caused damage rather than cleanliness. Trust me, mastering the right balance between pressure, nozzle choice, and movement has been my most valuable insight—saving time and protecting my surfaces. This small but vital understanding turns a daunting task into a manageable, rewarding process.
Tools That Keep My Power Washing Reliable
Investing in quality tools has been a game-changer. The MTM Hydro 4003 wand, known for its durability and versatility, ensures I can adapt to different surfaces without hesitation. The tri-axial surface cleaner attachment simplifies large-area jobs, providing even cleaning without streaks. These tools, combined with a rotating selection of nozzles, give me confidence that each project will deliver trustworthy, professional-looking results. Trustworthy equipment makes all the difference when aiming for consistent excellence.
The Heart of Power Washing—A Personal Call to Action
Embracing the art of careful, deliberate power washing can radically elevate your home’s curb appeal and longevity. Each step, from equipment prep to technique, plays a role in achieving the lasting shine you desire. If you’re tired of uneven results and surface damage, it’s time to refine your approach and trust in proven methods. Remember, every trusted job begins with a mindset committed to detail and care—so get out there and transform your exterior with confidence. For more guidance, explore this comprehensive guide.
This post offers some really practical insights—especially about the importance of technique over sheer pressure. I remember my first power washing attempt; I was eager to see quick results and used maximum pressure right away. The damage to my siding was a wake-up call that more force isn’t always better. Since then, I’ve learned to adjust the nozzle and take my time with each pass. I think one often overlooked aspect is the type of surface you’re cleaning. Have you guys found that certain materials need special treatment, like lower pressure or specific nozzles? It’d be great to hear how others have tailored their approach for different surfaces to avoid damage while still getting the job done effectively.
I couldn’t agree more with the importance of technique over simply increasing pressure. My own early mistakes with power washing taught me that rushing through a job often leads to uneven results or even surface damage. One thing I’ve found particularly helpful is always starting with a wider, lower-pressure nozzle to assess the surface, then gradually switching to a narrower, higher-pressure one if needed. Also, being mindful of the surface material makes a huge difference – delicate sidings or painted surfaces really do require lower pressure and specific nozzles to prevent etching or chipping. I’d love to hear how others choose their nozzles for different materials—do you have go-to settings for wood versus brick or concrete? It seems like paying attention to these details consistently yields much better, longer-lasting results, rather than just relying on brute force.