It was a muggy Saturday afternoon when I finally decided to tackle the dirt and grime building up on my home’s siding. I vividly remember hauling out my power washer, adrenaline mixed with a dash of overconfidence. As I unleashed that jet of water, I instantly regretted my choice—not because it didn’t clean, but because I saw tiny strips of vinyl start to peel away, exposing flaws I hadn’t noticed before. That moment was a lightbulb, a clear sign that power washing isn’t a one-size-fits-all solution. And I realized, if I wanted a spotless home exterior without risking damage, I needed to learn just how to do it right.
Prepare Your Equipment for Success
Start by inspecting your power washer ensuring it’s in top condition. Check for leaks, clean the nozzle, and verify pressure levels. For safety, wear protective goggles and gloves. Remember, a well-maintained machine is like a reliable tool; it delivers consistent results without risking damage.
Select the Appropriate Pressure and Nozzle
Think of your power washer as a paintbrush—different surfaces require different brushes. Use a wide-angle nozzle (e.g., 25° or 40°) for soft siding and a lower angle (15°) for stubborn grime. As you test on a small, inconspicuous area, adjust the pressure to avoid peeling paint or causing tears, much like tuning a guitar string for the perfect sound.
Test and Dial In Pressure
Starting with lower pressure and gradually increasing allows you to find a balance between effective cleaning and safety. Remember, excessive pressure can damage your siding—similar to a high-powered hose spraying holes in a paper bag. For tricky spots, pre-soaking with a cleaning solution enhances results without extra force.
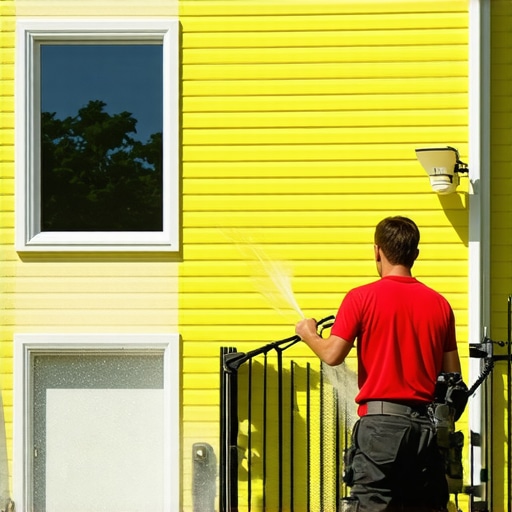
Apply Cleaning Solution Effectively
Use a detergent suited for home exteriors, such as a biodegradable cleaner. Apply from bottom to top, overlapping strokes, like painting a wall. Allow the solution to dwell for 5-10 minutes to loosen dirt, but never let it dry—drying can leave streaks, akin to streaks on a freshly painted wall. For best results, opt for eco-friendly options to protect your lawn and garden, as discussed in these eco-friendly tactics.
Master the Technique for Even Cleaning
Maintain a consistent distance—about 12-18 inches—from the surface. Use smooth, overlapping S-shaped strokes, like mowing a lawn, to prevent streaks and ensure uniform cleaning. Keep the wand moving steadily; pausing can cause water marks, similar to uneven paint strokes. For vertical surfaces like siding, work from bottom to top to avoid water runoff streaks.
Control Your Spray for Delicate Areas
For painted or delicate surfaces, opt for lower pressure (like adjusting your watering can to mist). Use a gentle, wide spray pattern, preventing paint peeling or wood fraying. Think of it as applying a gentle breeze instead of a hurricane—more control equals better results.
Pay Close Attention to Special Surfaces
Brick and stone require specific techniques—use a 25° nozzle and keep the wand moving quickly to avoid etching the surface. Consult this guide for detailed settings. For wooden decks, avoid high pressure that can cause splinters, focusing instead on soft washing with a wider spray pattern. Remember, applying excessive pressure is like peeling layers off an onion—one layer at a time.
Rinse Methodically to Achieve Shine
Once the surface looks clean and free of soap, rinse from top to bottom, ensuring all residue is washed away. Keep the wand at the correct distance and use overlapping strokes. This rinse process is vital—like finishing a painting with a final brush stroke—your final step in revealing a spotless exterior.
 While many believe that renting the most powerful pressure washer guarantees a spotless exterior, this misconception can lead to costly damage and unsatisfactory results. As an expert, I’ve seen countless homeowners overshoot pressure settings, causing peeling paint or even crumbling bricks. The truth is, effective power washing hinges on understanding nuanced techniques and surface-specific adjustments—like selecting the right nozzle angle or pre-soaking delicate surfaces—rather than simply cranking up the pressure. Relying on branded equipment or high PSI without proper knowledge can be a trap, resulting in reduced lifespan of your surfaces and even your power washer. Instead, focus on mastering proper techniques, such as maintaining appropriate distances and using eco-friendly cleaning solutions, which safeguard your home while ensuring lasting cleanliness. Remember, the goal isn’t just a quick clean but a trusted, durable result. For detailed guidance, trust resources like those offered in trustworthy power washing tips. Have you ever fallen into this trap? Let me know in the comments!Maintaining peak performance of your power washer requires more than just dropping cash on the latest model. It’s about choosing reliable tools and adopting proven methods that extend your equipment’s lifespan and ensure consistently stellar results. Personally, I swear by a high-quality surface cleaner attachment, which revolutionizes driveway cleaning by delivering uniform agitation and saving hours of work. Unlike traditional nozzles that can leave streaks or damage surfaces if misused, a dedicated surface cleaner minimizes risk and maximizes cleanliness. For stubborn grime, I always rely on eco-friendly, biodegradable detergents, which not only protect my lawn but also prevent buildup inside the machine, reducing maintenance calls. When it comes to routine upkeep, a good power washer soap injector simplifies applying cleaning solutions evenly, allowing me to focus on technique rather than fiddling with manual mixing. Regularly inspecting hoses and valves using a nozzle pressure tester helps me spot potential leaks or pressure drops before they become costly repairs. As technology advances, I foresee a shift toward smart power washers with diagnostics that alert you to needed maintenance—much like modern cars. These innovations will make maintaining your equipment even easier and more reliable. How do I keep my power washing tools running smoothly over time? Consistent cleaning after each use, lubricating moving parts, and storing everything in a dry, elevated space are essential practices. Avoiding the trap of neglecting routine maintenance is especially crucial; it’s like giving your car regular oil changes—neglect leads to breakdowns. Build a schedule based on your usage volume, and don’t forget to replace worn-out hoses and nozzles proactively, rather than waiting for failure. For detailed guidance, I recommend reviewing trustworthy resources like those offered in trustworthy power washer maintenance tips. For example, according to a recent technical bulletin from Kärcher, using high-quality replacement parts and following a preventative maintenance schedule can extend your equipment’s lifespan by years. Try integrating their recommended lubrication techniques into your routine this month, and you’ll notice a difference in performance and longevity. Investing time in proper upkeep not only preserves your tool’s reliability but also ensures your surfaces remain spotless without the risk of costly repairs down the line.
The Hardest Lesson I Learned About powerwashing,power wash home,power washing,powerwasher
One of the biggest challenges I faced was realizing that rushing through the process leads to damage, not cleanliness. Patience with proper technique and surface assessment is crucial—hurrying can strip paint or etch your driveway. Consistently refining my approach, I discovered that surface-specific adjustments and understanding how pressure interacts with materials make all the difference.
3 Wisdoms From My Power Washing Journey That Changed Everything
- Prepping surfaces is half the battle: A thorough rinse and pre-treatment prevent streaks, saving time and effort.
- Know your surfaces: Brick, wood, vinyl—each demands a different nozzle, pressure, and technique. Ignoring this can cause costly repairs.
- Clean with confidence, not force: Using lower pressure on delicate areas preserves your siding and enhances lasting results. This approach is more effective than simply turning up the pressure.
Tools and Insights That Elevate My Power Washing Results
- Surface cleaner attachments: They deliver uniform results on driveways and decks while reducing effort and risk of damage. Trust me, this upgrade streamlines the job and prolongs your equipment’s lifespan.
- Eco-friendly detergents: Biodegradable cleaners protect your lawn and prevent machinery buildup, safeguarding your home environment. I rely on them for safer, longer-lasting cleaning.
- Routine maintenance techniques: Regularly inspecting hoses, replacing nozzles, and lubricating parts ensure reliability. Proven resources like trustworthy maintenance tips help me stay ahead of breakdowns and costs.
Seize the Power Washing Momentum
Embark on your power washing journey with curiosity and care—it’s not just about a shiny exterior, but building trust in your results and your equipment. With patience and the right techniques, you’ll discover that a well-maintained home exterior can boost curb appeal and value for years to come. Don’t wait to make your outdoor spaces look their best; your home deserves that shine today. Have you ever felt overwhelmed choosing the right pressure or nozzle? Let me know in the comments below!
Reading this post really resonated with my own experience of power washing. I once underestimated the importance of adjusting pressure settings for vinyl siding, and I ended up causing some peeling that I had to fix later. It’s a good reminder that more isn’t always better when it comes to pressure. One thing I’ve learned over the years is that testing on a small, hidden spot first can save a lot of headaches. I also agree that using eco-friendly detergents is better for the environment and your home’s surfaces. It makes me wonder, what are some of the most common mistakes homeowners make with power washing, and how can they be avoided? It seems like patience and proper technique are the keys to not only achieving a deep clean but also protecting your home’s exterior. Has anyone found a specific nozzle or pressure setting that works particularly well for vinyl siding without risking damage? I’d love to hear other tips from the community.
This post really hits home for me because I learned the hard way how dangerous high pressure can be, especially on vinyl siding. I once thought cranking up the PSI would speed up the cleaning process, but I ended up with peeling and, eventually, the need for repairs. Now, I always start with the lowest setting and test on a hidden corner before proceeding. One technique I’ve found helpful is using a wider spray tip, like 40°, for softer surfaces, and only switching to a narrower angle for tougher stains. Also, soaking the area with a cleaning solution beforehand really makes a difference—less pressure needed for a thorough clean.
For those struggling with the right balance, how do you determine the optimal distance and pressure for delicate surfaces? Are there any specific brands or models that make this easier to dial in? I think patience and understanding your equipment are key—rushing is the biggest mistake. Would love to hear more tips on applying eco-friendly cleaners and avoiding common pitfalls. Looking forward to learning from others’ experiences!