I’ll never forget the moment I realized my home’s façade was losing its charm. After a long winter, I glanced at my siding and slapped my forehead—dirt, grime, and algae had taken over, making my house look tired and neglected. That was my lightbulb moment, and I knew something needed to change. The frustrating part? Despite trying to haphazardly spray water on it, I only made things worse—leaving streaks and sometimes even damaging the paint. If you’ve ever felt that way, you’re not alone.
Why Consistent Power Washing Makes a Difference
Is Power Washing Really Worth It?
Here’s a truth I learned the hard way: skipping proper techniques or rushing through power washing can cause just as much harm as neglecting to clean at all. Early on, I made the mistake of using too much pressure on my siding, which led to chipped paint and even tiny cracks. Trust me, I see many homeowners fall victim to this common pitfall. But there’s good news—you can achieve a lasting, gleaming exterior by following proven, trustworthy methods. Discover expert tips for reliable power washing here to avoid these issues and get the results that truly last.
Power washing isn’t just about making your home look good—it’s about protecting your investment, improving curb appeal, and maintaining the home’s integrity over time. And the best part? When done correctly, the results are impressive and truly durable. But what’s the secret? It all comes down to understanding the right techniques and equipment, avoiding typical mistakes, and knowing when to call in a professional. Keep reading, and in the next section, I’ll walk you through how to make your exterior shine like new, without risking damage or wasted effort. Whether you’re tackling your siding, deck, driveway, or gutters, these tips will set you on the right path.
Start with Safety and Preparation
Choose the Right Equipment
Before diving into power washing, select a pressure washer with adjustable settings. Think of it like choosing a camera lens; you need the right focus to avoid damage. For most home exteriors, a unit with 2500 to 3000 PSI is sufficient. Using too high pressure can chip paint or create cracks, while too low may be ineffective. I once tried a supermarket-grade washer for my siding, but it tangled the job and caused streaks—lesson learned.
To understand the nuances, check out trusted techniques for lasting results and ensure your equipment matches the task.
Gather Necessary Supplies
Safety gear is non-negotiable: goggles, gloves, and long-sleeved clothing protect you from debris and water spray. Use eco-friendly cleaning solutions when needed, but remember: often, high-pressure water alone can do the job. Also, have extension wands for reaching higher spots and nozzles of different spray patterns ready. These tools are your arsenal for an effective clean, much like a chef’s knives in the kitchen—each has a purpose.
Preparing Your Site for Power Washing
Clear the Area and Cover Plants
Remove outdoor furniture, flower pots, and any fragile items. Cover your plants and flowers with plastic sheeting; high-pressure spray can harm them or cause water runoff. Once, I neglected this step and ended up with a muddy mess in my flowerbeds—an avoidable mishap. To better visualize, an image like the one I once used, showing proper coverage, can be helpful.
Seal Windows and Cover Electrical Outlets
Protect glass surfaces and electrical fixtures with painter’s tape or plastic sheeting. Power washer spray can shatter windows or short-circuit outdoor fixtures. During my first attempt, I learned this the hard way when water seeped into an outdoor outlet, causing a small spark—definitely a moment I won’t forget.
The Power Washing Technique
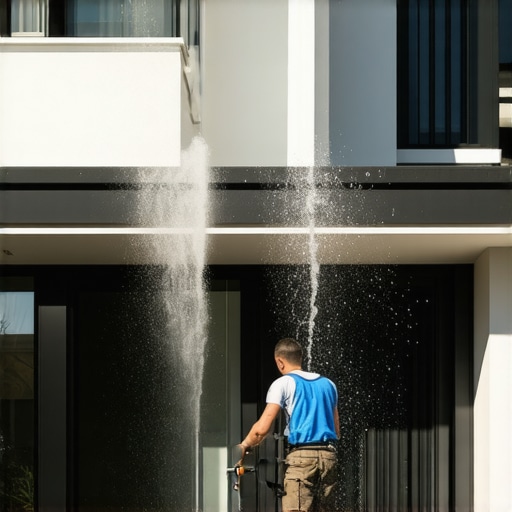
Maintain the Correct Distance
Hold the nozzle approximately 18-24 inches from the surface. Moving too close risks damage, while too far reduces effectiveness. I remember getting too comfortable with my first attempt and almost peeling paint when I stood too close. Think of it like painting with a spray gun—distance is everything. Keep a steady, sweeping motion to distribute the water evenly.
Use Sweeping Motions and Overlap
Maintain consistent speed, overlapping each pass by about 50%, similar to mowing a lawn for even coverage. This technique prevents streaks and ensures uniform cleaning. In my early days, I was tempted to rush, resulting in patchy results—and more work later. Patience here pays off. For detailed guidance, the reliable techniques for lasting results are invaluable.
Adjust Pressure and Nozzle Settings
Start with a wider spray angle (worldly 25 or 40 degrees) for gentle cleaning, then switch to narrower angles for stubborn grime. Avoid high pressure on delicate surfaces like soft wood or old paint. Remember, it’s better to start low and increase pressure gradually—rushing can cause irreparable damage, like I once did by knocking off peeling paint entirely with a too-powerful jet.
Finishing Touches
Rinse and Inspect
After covering all surfaces, thoroughly rinse the entire area to remove loosened dirt and cleaning residues. Walk around, inspecting for missed spots or streaks. During one session, I missed a corner, which stood out like a sore thumb afterward—so inspect carefully before finishing.
Cleanup and Maintenance
Drain the hose, disconnect the power, and clean your equipment. Store everything in a dry place for next time. Proper maintenance extends your equipment’s lifespan and ensures trusted results in future projects. Frequent checks and gentle cleaning keep your power washer ready for the next round.
While many homeowners believe that power washing is a straightforward task, a deeper look reveals that some widespread beliefs can actually hinder your efforts and even cause damage. One of the biggest myths is that more pressure always equates to cleaner surfaces. In reality, applying excessive pressure can strip paint, damage siding, or force water into areas where it shouldn’t go, leading to costly repairs. Trusting in the myth that cheaper equipment suffices can also backfire; inexpensive, non-adjustable units lack the finesse needed for sensitive surfaces, increasing the risk of harm. Instead, opt for equipment with adjustable settings and learn how to use them properly, as recommended in trusted sources like professional power washing techniques.
Another nuanced mistake is neglecting the importance of proper surface prep. Skipping steps like covering plants or sealing windows may save time upfront but can lead to water infiltration and plant damage—an error many overlook until after the damage is done. Advanced practitioners understand that meticulous preparation pays off in the long run, ensuring a safe and effective clean.
A common trap that even seasoned DIYers fall into is rushing the process, especially when tackling stubborn grime. This often results in inconsistent results and potential surface damage. Instead, using the right nozzle at the correct distance and overlapping passes, as described in expert-approved techniques, combine to produce uniform, trustworthy results.
So, what else might trip you up? Have you ever fallen into this trap? Let me know in the comments!
Why do some power washing techniques cause more harm than good—really?
The key lies in understanding the nuances of pressure and surface compatibility. For delicate surfaces like older wood or vinyl siding, even moderate pressure can cause peeling or cracking if not applied correctly. An insightful study from industry experts emphasizes that adjusting the nozzle angle and pressure is critical to prevent surface degradation and achieve a durable, lasting shine. This is why seasoned professionals advocate for knowledge-based techniques over brute-force cleaning. To master these advanced skills, check out trustworthy power washing strategies that highlight surface-specific methods.
Always remember, power washing is less about brute force and more about finesse. By debunking myths and understanding the finer details, you ensure your efforts result in a beautiful, long-lasting exterior rather than costly mistakes. Ready to elevate your cleaning routine? Dive into trusted techniques and start trusting your power washer like a pro.
Keep It Working: Tools I Recommend for Power Washing Success
Maintaining your power washing equipment is crucial for long-term performance and consistent results. Over the years, I’ve discovered that investing in quality tools and developing a routine maintenance schedule prevents breakdowns, extends the lifespan of your equipment, and ensures your cleaning projects always go smoothly. The first step is choosing a sturdy, adjustable-pressure washer—my personal favorite is a model with a variable pressure setting that allows precise control, reducing the risk of surface damage. I recommend the Sun Joe SPX3000 because its dual detergent tanks and adjustable pressure make it versatile for various surfaces; it has served me well for both residential projects and delicate siding cleaning.
In addition to the washer itself, high-quality accessories are essential. I always use a nozzle with adjustable spray patterns, especially a 25-degree nozzle, which I’ve found provides an ideal balance between power and gentle cleaning. For reaching higher surfaces like gutters or second-story siding, extending wands with reliable connectors save time and effort. I personally favor the Simpson Extension Wand because its robust build and adjustable length make tackling different heights straightforward.
Beyond the equipment, routine maintenance and proper storage can drastically improve your power washing results. After each use, I flush out the hoses with clean water, drain all water to prevent freezing damage, and store the equipment in a dry, sheltered space. Regularly inspecting hoses, nozzles, and filters for wear or clogging ensures peak performance. Additionally, using a high-quality pump protectant—such as pump protector solutions—helps prevent corrosion and prolongs the life of internal components, especially if you live in colder climates.
How do I maintain my power washing tools over time?
To keep your equipment in top shape, it’s vital to perform scheduled checks and routine upkeep. This includes replacing worn-out parts like nozzles or hoses before they fail, applying lubricants to moving parts, and periodically flushing the pump with a cleaning solution to prevent buildup. Following manufacturer guidelines and consulting expert resources like trusted power washing maintenance tips ensures longevity and reliable performance. Investing a little time in maintenance not only saves money on repairs but also gives you confidence that your tools are always ready for the next job.
Understanding the trend towards eco-friendly and energy-efficient equipment is also shaping future innovations. Manufacturers are increasingly developing hybrid or electric models that minimize emissions while maintaining power. I predict that as technology advances, we’ll see smarter, more durable tools that integrate IoT sensors for real-time performance monitoring—making maintenance even easier and more proactive.
If you want to elevate your power washing game, I suggest trying out a routine pump flush with cleaner solutions. This simple step can drastically extend your equipment’s life and ensure consistent, reliable results. Taking care of your tools today lays the foundation for dependable power washing projects tomorrow and beyond.

High-quality power washing equipment ready for maintenance and use.
Reflecting on my journey with power washing, I’ve realized that some of the most impactful lessons came from early mistakes and unexpected surprises. One of the biggest lightbulb moments was understanding that surface sensitivity is king—what works for concrete can ruin soft wood or vinyl siding if not approached correctly. This insight pushed me to learn the nuances of pressure and nozzle choices, ultimately saving me from costly repairs and frustration. Additionally, I discovered that patience and preparation often outweigh brute force; taking the time to cover plants and seal windows before cleaning made the entire process smoother and safer. These lessons have empowered me to tackle projects with confidence and to share strategies that truly work.