It happened again. I was mid-sentence on a beautiful Saturday morning, coffee in hand, when I glanced at my windows. To my horror, streaks and water spots blurred the glass. No matter how careful I was, the power washer seemed to betray me, leaving me with a cloudy, streaky mess. Frustration bubbled up. Why does it seem so impossible to get those crystal-clear, streak-free windows?
Why Streaks Are the Biggest Power Washing Mystery (And How to Break the Pattern)
The truth is, I learned the hard way. Early on, I made a critical mistake—using too much pressure and unevenly moving the wand. It seemed harmless initially, but I ended up with water spots that refused to budge. That’s when I discovered that a balanced approach and proper angle are key to streak-free results. For more expert insights, check out [effective power wash home strategies](https://powerwashexpertz.com/effective-power-wash-home-strategies-for-long-lasting-trust-shine).
So why do streaks happen? Streaks form when water and cleaner dry unevenly, leaving behind residue or water spots. Environmental factors like hard water or dirt buildup can make the problem worse. The good news? With proven techniques, you can prevent streaks and ensure a spotless finish every time.
But don’t just take my word for it. According to recent studies, correct wand angles and the right pressure are essential to avoiding marks and streaks. Implementing these small but crucial adjustments can make a world of difference.
Are you tired of redownloading your photos because of streaky windows? Or perhaps you’ve accepted streaks as just part of power washing? If so, you’re not alone. Fortunately, I’m here to guide you through practical, easy-to-apply tactics that will elevate your window cleaning game.
Ready to finally conquer those stubborn streaks? In the next sections, I’ll walk you through step-by-step instructions to transform your power washing routine—saving time, effort, and those frustrating re-dos. Let’s get started!
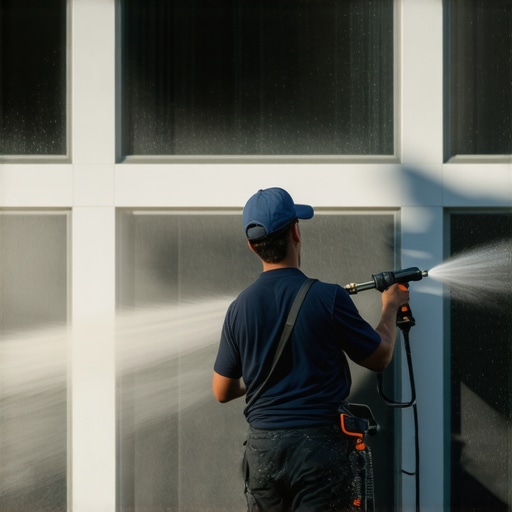
Set Up Your Equipment Correctly
Before you grab your power washer, ensure it’s properly maintained. Check the nozzle for clogs, attach the appropriate tip—preferably a 25-degree for windows—and test the pressure on a scrap piece of wood or cardboard to verify it isn’t too high, which can cause streaks or damage. I once started cleaning my windows with a high-pressure nozzle, causing streaks and water spots. After adjusting to a lower-pressure setting and verifying the spray, my results improved instantly.
Choose the Right Nozzle and Pressure
The key is to use a wide-angle nozzle, typically 25 or 40 degrees. A narrow nozzle concentrates water, increasing the risk of streaks and damage. Set your pressure to around 1500-2000 PSI for windows; too high, and you’ll leave streaks, too low, and dirt won’t come off. Think of it like watering delicate flowers—gentle streams deliver better results without over-saturating. For detailed guidance, review these expert tips.
Maintain the Correct Distance and Angle
Hold the nozzle about 2 feet from the surface, aiming at a 45-degree angle. This avoids direct hits that can cause streaks or damage. During my second attempt, I realized that holding the wand too close created uneven cleaning and streaks. Keeping a consistent distance and angle ensures a uniform application, similar to painting with a roller—not too close, or you’ll leave marks.
Use Even, Overlapping Strokes
Clean your windows in horizontal or vertical strokes, overlapping each pass by about 50% to prevent streaks. Moving too quickly or unevenly leaves areas untreated or overdone, leading to streaks. I once moved the wand erratically, resulting in uneven cleaning. After adopting a steady, overlapping pattern, my windows shone like glass.
Control Water and Drying Speed
Use a gentle spray and avoid excessive water flow—think of watering a garden delicately. After rinsing, dry the surface promptly with a squeegee or a microfiber cloth to prevent water spots, which are common causes of streaks. I made the mistake of letting water dry naturally on the glass, leaving marks, but once I dried the windows immediately, clarity improved dramatically.
Post-Cower: Final Checks
Inspect your windows from different angles to catch missed spots or streaks. If any appear, lightly go over them with a soft cloth or sponge. Also, remember environmental factors: cleaning on a cloudy day minimizes evaporation issues and streaking. For comprehensive strategies, see trusted power washing techniques.
 Many homeowners assume that a simple blast of water is enough for a flawless exterior. However, this common belief often leads to overlooked nuances that can sabotage your results. Everyone says to crank up the pressure for deep cleaning, but in reality, excessive force can damage your siding and cause costly repairs. Instead, understanding the **precise pressure levels and nozzle selection** is critical—using a wider spray at lower PSI delivers cleaner, safer results.
Why does more pressure sometimes mean worse results for your home?
Research shows that higher pressure can erode paint, strip sealants, or even damage delicate surfaces like stucco. Experts recommend tailored settings; for instance, trusted techniques emphasize adjusting your pressure based on surface type, not just defaulting to maximum settings. Moreover, many overlook the importance of **proper technique and environmental considerations**. A typical mistake is washing in direct sunlight, which causes soap and water to evaporate quickly, leaving streaks and spots—an issue that advanced power washers address by employing quick-drying techniques. Beyond equipment, understanding the **hidden role of water chemistry** can also make or break your cleaning session. Hard water, rich in minerals, can leave deposits that appear as streaks or spots, even after thorough rinsing. Using a water softener or specialized detergents can prevent this, elevating your results to a professional level. Don’t just rely on brute force; mastery involves finesse and nuanced adjustments. To further refine your approach, consider effective strategies that focus on environmental factors, equipment handling, and surface-specific techniques. Have you ever fallen into this trap of overpressure or neglecting surface specifics? Let me know in the comments.When it comes to achieving professional-quality power washing results, having the right tools and knowing how to maintain them is essential. Personally, I rely on high-grade pressure washers with adjustable PSI settings to adapt to different surfaces, ensuring I don’t damage siding or other delicate areas. For example, choosing a model with variable pressure control allows me to dial in the exact power needed—saving time and preventing potential repair costs. To keep my equipment performing optimally, I schedule regular maintenance, such as inspecting hoses for cracks, cleaning the nozzle filters, and lubricating the pump according to the manufacturer’s guidelines. These small but consistent steps extend the lifespan of my power washer and guarantee reliable results season after season. According to expert advice, routine checks can prevent unexpected breakdowns and inconsistent performance, which is crucial for tackling large projects or multiple properties in a row. Looking ahead, I predict this trend will focus more on smart, connected pressure washers that offer real-time diagnostics and maintenance alerts, making upkeep even easier for homeowners and professionals alike.
### How do I maintain my power washing tools over time?
Maintaining your power washing equipment involves several key practices. First, always flush out the system after each use to remove any residual dirt or cleaning solutions. Next, drain the water from hoses and nozzles to prevent freezing and cracking in colder months. Inspect spray tips for signs of wear or clogging, and replace them as needed—using worn nozzles can lead to uneven cleaning and streaks. Additionally, apply pump lubricant periodically to keep internal seals supple, ensuring consistent pressure and flow. Storing your equipment in a dry, sheltered location also shields it from weather damage and prolongs its lifespan. If you’re serious about long-term results, consider investing in professional-grade tools with built-in safety features and adjustable settings; these will give you finer control and improve the quality of your work. Remember, consistent maintenance not only extends the life of your tools but also ensures that every power wash is safe, efficient, and streak-free. For detailed maintenance routines tailored to specific models, visit our trusted [power washing experts](https://powerwashexpertz.com/effective-power-wash-home-strategies-for-long-lasting-trust-shine).

Over the course of my power washing journey, I realized that the biggest hurdle isn’t just the equipment, but the mindset behind each spray. An unexpected lesson was how patience and subtle adjustments consistently trump brute force. Every stubborn streak taught me to respect the surfaces I was cleaning, understanding their unique needs and sensitivities. This insight became the cornerstone of my successful routine, transforming frustrations into reliable results.
Another key revelation was recognizing environmental cues—like the sun’s position or water mineral content—that influence cleaning outcomes. By adapting my approach based on these factors, I finally achieved that crystal-clear finish I’d always aimed for. These lessons are invaluable for anyone looking to elevate their power washing game beyond trial and error.
Lastly, I learned the importance of ongoing learning—listening to expert advice, reading about new techniques, and practicing steadily. Power washing isn’t just a quick task; it’s an art form shaped by continuous refinement. Embracing this mindset has empowered me to deliver trustworthy, streak-free results with confidence, turning a mundane chore into a mastery worth sharing.